
The problem with the fisheyes
I like fisheye lenses – just look at the name of this homepage and you understand that wide angle photography is something I really enjoy. The distortion doesn’t bother me much, only if someone uses the fisheye lens really wrong with extremely curved horizons etc. If you align your photo with the horizon in the centre it’s often not even obvious that a fisheye lens was used, at least when it comes to landscape photos. In architecture things are different though: The curved lines are much more obvious and how much it bothers someone is a very individual thing. Let’s see an example of an uncorrected fisheye photo where the curved lines are quite obvious.

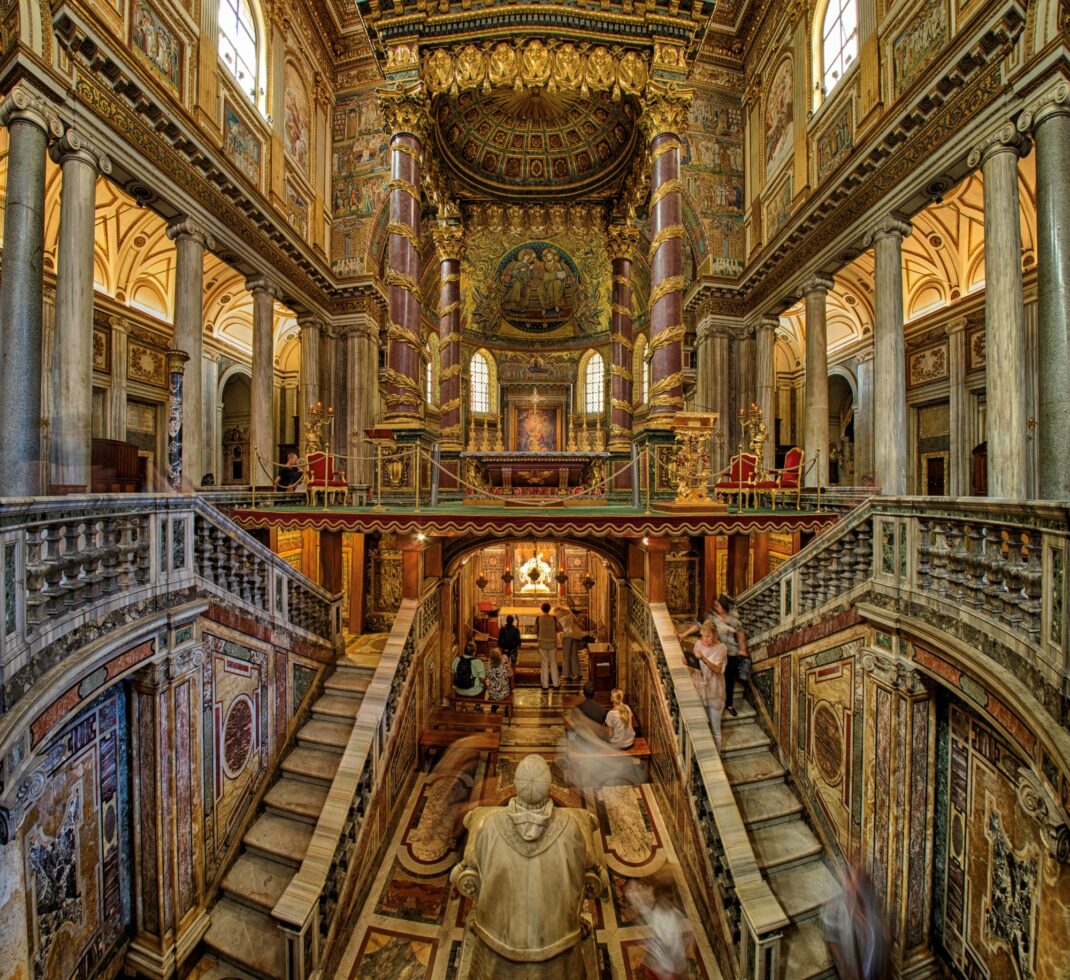
Panini Projection
There are several tools available to correct the fisheye distortion, one of these tools is Hugin and it’s free. Every projection method has it’s advantages and disadvantages, has a more or less effect on the details / resolution of the picture. You can read about the different projections on the Hugin page, I only talk about the Panini projection exclusively today.
When using the Panini projection only the vertical lines and the vanishing lines are corrected, not the horizontal lines. I will show you some pictures later on what that means. The advantage of this method is, that the field of view is only slightly smaller than in the uncorrected picture and there is only minimal loss of resolution and details (in fact, I don’t see any loss of details when looking at the 100% zoom). Other projections loose significantly more resolution and details. Of course there is a drawback since the horizontal lines are still curved so it’s not completely “defished”. For my eye the vertical distortion is much more disturbing than the horizontal distortion so I can live with that compromise really good, others might have a completely different opinion of course. It’s important though to put the horizon in the centre of your frame so you don’t get a curved horizon. While it’s also possible to correct this it’s more complicated and not part of this “quick & dirty” tutorial.
Using Hugin
Let’s take a look at the parameters in Hugin, in this case for my Samyang 7.5mm Fisheye lens on the Olympus PEN E-P5 camera: Choose “full frame fisheye” and the focal length of lens, in my case 7.66mm (7.5 is a rounded value) after you imported the picture (drag and drop works). The focal length multiplier is “2” because I am using a Micro Four Thirds camera with a crop factor of “2”. For APS-C it would be “1.5” and for Fullframe cameras “1”,

After I imported the picture I can go directly to the “Stitcher” tab at the top just below the menu and choose the “”Equirectangular Panini” projection. You can play with the other projection methods also, just try it out and choose what pleases your eye. The finals steps are clicks on the “Calculate Field of View”, Calculate optimal size” and “Fit crop to images” buttons. I don’t use the other parameters because I already adjusted the highlights, shadows etc. in Lightroom before the import. One final click on “Stitch!” and you are done and can choose where to export the new photo.

Photo examples using Panini Projection
Let’s see some examples of fisheye photos from Rome that I made with the Olympus PEN E-P5 and the Samyang 7.5mm Fisheye lens. The first picture is always the uncorrected fisheye picture and the second one is the result from the Panini projection method as described above.


As you can see, the vertical and vanishing lines are corrected in the Panini version. When looking at the ground or the benches you still see the distortion of the horizontal lines but nevertheless it looks much better in my opinion. You don’t loose much resolution and don’t get stretched corners like with other projection methods. Here are some more examples from my recent trip to Toledo. I uploaded the Panini versions exclusively this time so there is no “before and after” photo comparison.


This short tutorial is just one of many projection methods and in my opinion it shows that fisheye lenses can be useful even in architecture photography. Do you have thoughts, other methods or general remarks? Please write them in the comments below!


I absolultey agree with everything. I’ve tried many different projections but Panini seems to be most useful one. Many people claim rectilinear is what is most natural, but when you make it go too wide then it looks even more weird with stretching going on, while Panini looks much more “beliveable” in general.
Thanks for your comment – I agree that rectilinear is often bad for the edges, especially if there are people placed. I think Panini projection is a good compromise and can lead to quite interestig pictures.
Why can’t we remove the vertical fisheye distortion that the Panini projection still has?
Thanks for the tip for using Hugin. I prefer it to the Lightroom lens correction.